

A dark/light mode switch is a popular feature in mobile apps as well as on computers and smartphones these days. While this feature isn’t as prevalent on websites, it can be added — either to completely transform the design’s theme or as a temporary special effect.
In today’s tutorial, we’re going to show you how to add a unique dark/light mode toggle to your web design using the Modern Web Agency Website Template.
Table of Contents:
- Step 1: Delete any layers you don’t need
- Step 2: Edit the background colors
- Step 3: Edit the overlay
- Step 4: Customize the content
- Step 5: Add a button
- Step 6: Create a dark/light mode switch
- Step 7: Move new layers behind the overlay
- Step 8: Do a responsive check and edit
How to add a custom dark/light mode switch to your design
While this tutorial will show you how to edit this template, the primary purpose of this one is to demonstrate how to add a dark/light mode switch to your designs.
So we’ll make some slight adjustments to the appearance of the template while inserting a custom dark mode toggle that looks and works like this:
For help getting started with Slider Revolution, check out these references:
Note: In this tutorial, we’ll only be editing the Hero module. If you want to build out your entire website using this template, install the entire template package and not just the individual module.
Step 1: Delete any layers you don’t need
For the purposes of this tutorial, we’re going to greatly simplify this design. As you get to work on customizing the template for your own purposes, consider which of these layers you need. For those you don’t, this is the process to remove them.
Scroll down to the layers list in the timeline editor. To delete a single layer, click on the name. Then hit Backspace or delete.
To delete more than one layer at a time, hold down the Ctrl or command key, select the layers to delete, then hit Backspace or delete.
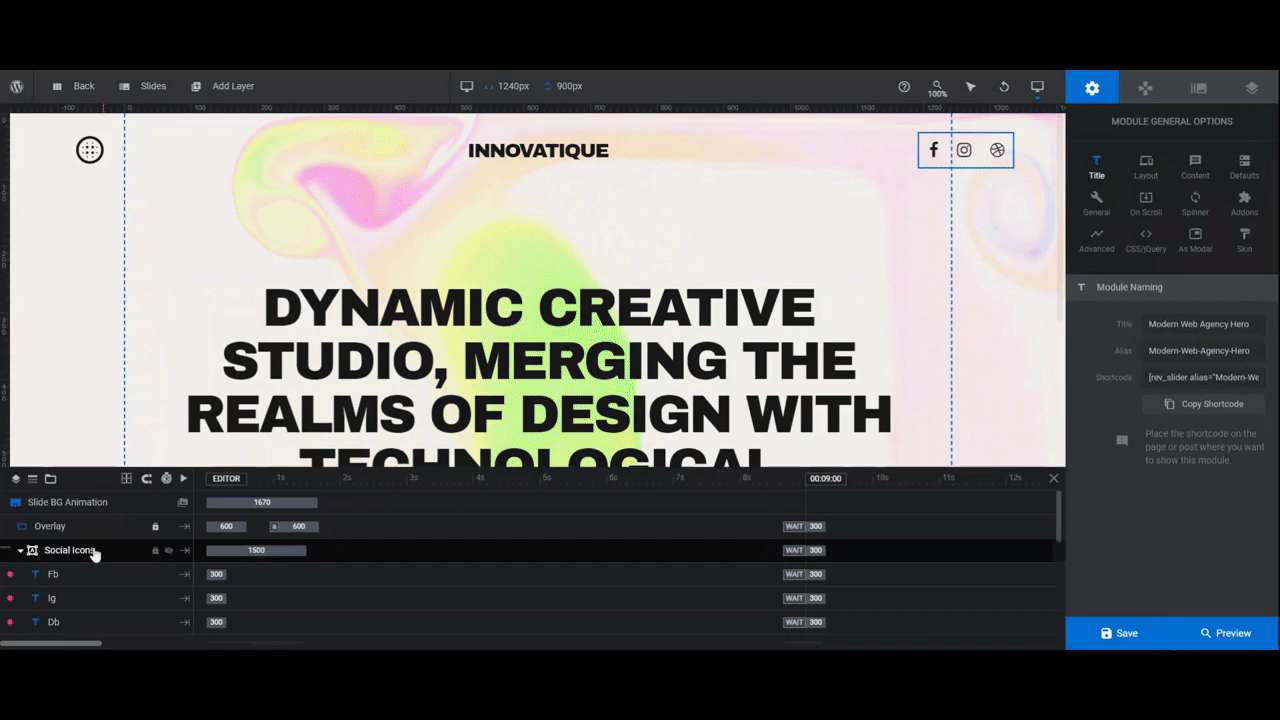
Note: For grouped layers (like Social Icons or Menu), you don’t need to select the individual layers one by one. Instead, select the group name and then hit Backspace or delete. This will remove all the content within it at once.
Learn more:
Step 2: Edit the background colors
When the template first loads, two colors appear. There is a solid black background that’s pushed out of the way by a light gray color — first along the edges and then down the center.
To edit these two colors, you’ll need to go to different areas inside Slider Revolution.
First, go to “Module Options” and “Layout” to change the black color. Scroll down to “Module Background”.
Click the color block next to BG Color. In the color selection dialogue, you can either select one of the preset colors in the bottom-right corner or enter a custom HEX code in the Color field.

Click the blue checkmark to save your changes.
Then go to “Slide Options” and “Background” to change the gray background color to the color of your choice.
Learn more:
Step 3: Edit the overlay
The Overlay layer comes into view whenever someone hovers over the text in the center of the screen. It’s also what we’ll use to turn our dark mode on.
To edit this layer, you have to first unlock it.
Hover over the Overlay layer in the timeline. Click on the lock symbol to the right of it to make it selectable.
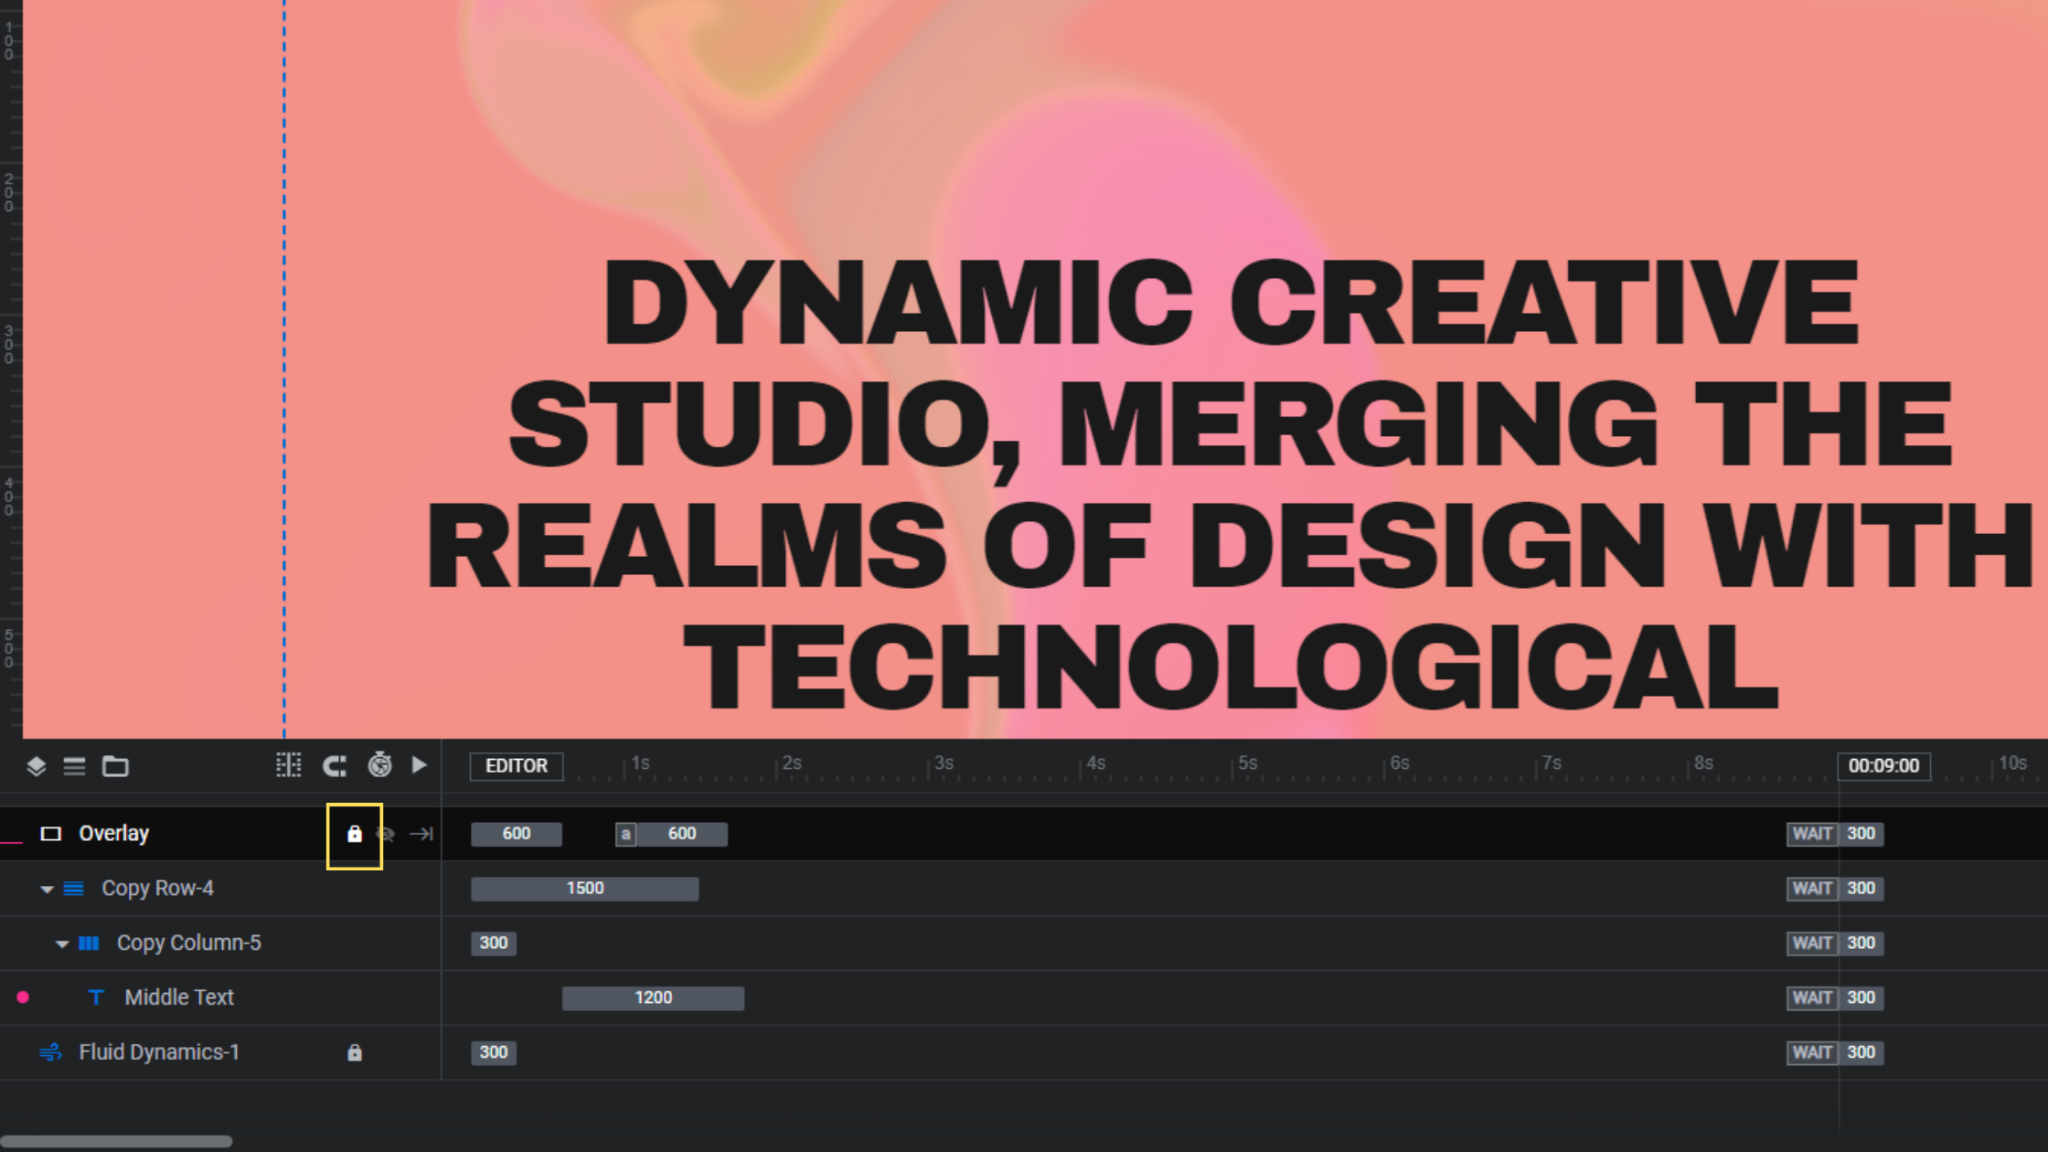
With the layer selected, go to either “Content” or “Style” to edit the color.
Note: The color you choose for the Overlay is not what appears when you hover over the text (or, soon, your new dark/light mode toggle).
There’s a setting under “Adv Style” called “Blend Mode”. It’s currently set to difference.
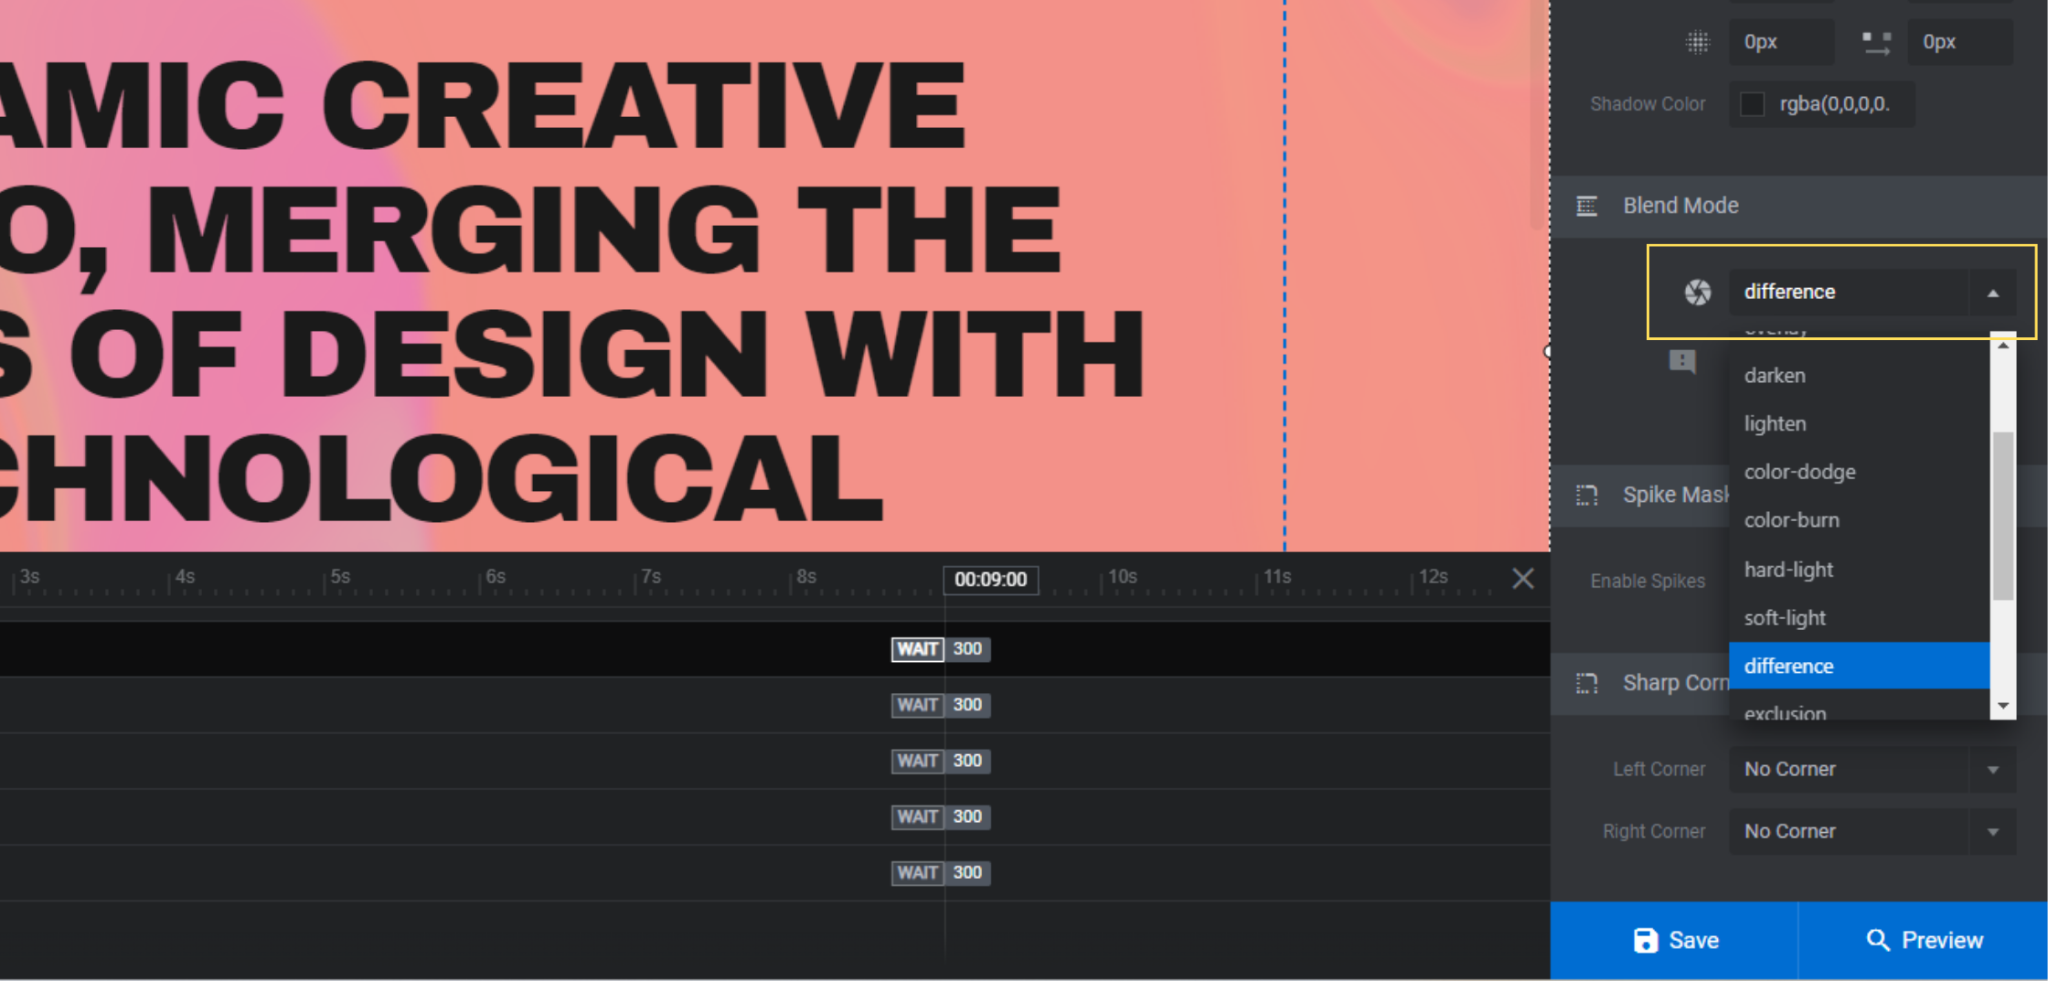
If you’ve never used blend mode settings in a tool like Sketch or Adobe before, Sketch has a good explanation of what they each mean.
The current difference setting does the following: “Subtracts the blend color from the base or vice versa, depending on which is brighter. When two pixels are the same, the result will be black.”
It essentially inverts the colors. It might take some trial-and-error to find the right color for your dark mode switch. If all else fails, set the Overlay to match the slide background color and you’ll end up with black for your dark mode.
Learn more:
Step 4: Customize the content
We removed all of the text layers except for the Middle Text headline. To customize the content in this remaining layer, select it either in the canvas or the timeline.
Note: If the Overlay layer is still unlocked, you’ll need to lock it back up in order to select anything in the canvas.
To update the copy, go to “Content” and replace the existing text with your own. Then go to “Style” to change the font, color, weight, and other styles as needed.

As it stands now, the text is the trigger for the dark mode effect. However, we are going to create a toggle to turn it on and off. So we need to disable this for the text block.
With Middle Text still selected, go to “Actions”. There’s a trash can symbol to the right of the two actions in this panel. Click both of them to delete the actions.

To save your changes, close the panel.
Learn more:
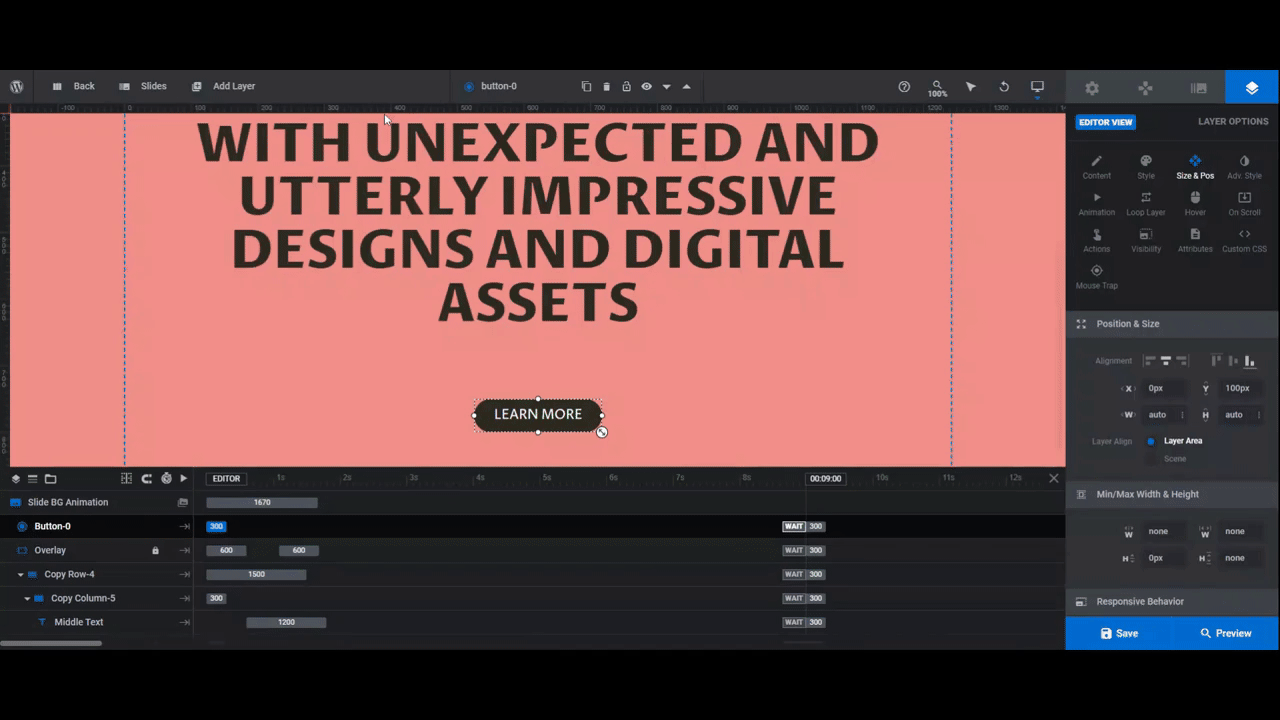
Step 5: Add a button
In place of the menu links that sat below the headline, we’re going to add a button.
To add a new layer, go to the top toolbar, hover over “Add Layer” and select Button. This will insert a new button into the canvas and open a sidebar of premade designs to choose from.
Scroll through and hover over the designs to find the one you like best. Click on it to update the button’s style.
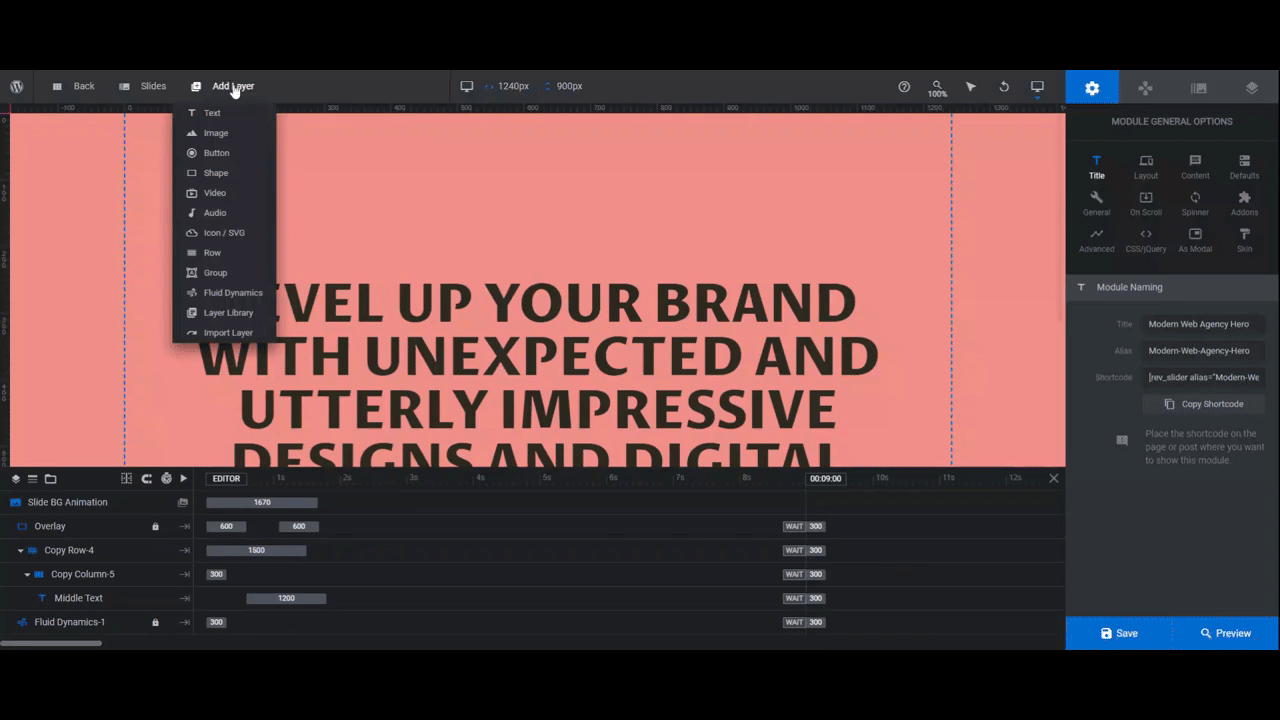
To adjust the wording and appearance of the button, use the “Content” and “Style” panels. From the style panel, you’ll also be able to change the button’s background color, border, and internal padding.
Once you’re done customizing the button, you need to move it into place. While you can drag and drop it in the canvas, you won’t be able to perfectly center it this way.
To ensure proper placement, go to “Size & Pos”.
Start by using the Alignment buttons to bottom-align and horizontally-center the button. Then use the Y setting to move the button up as much as you need to.
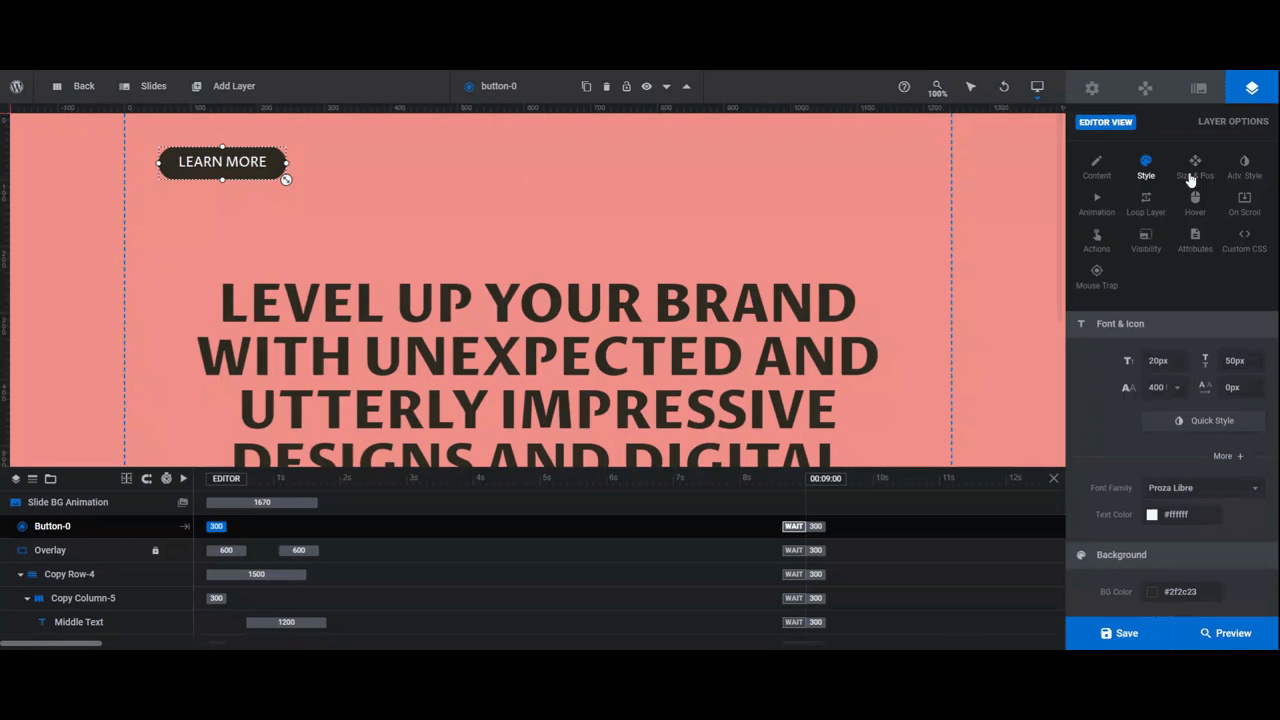
The last thing to do is program your button link. Open up the “Actions” panel.
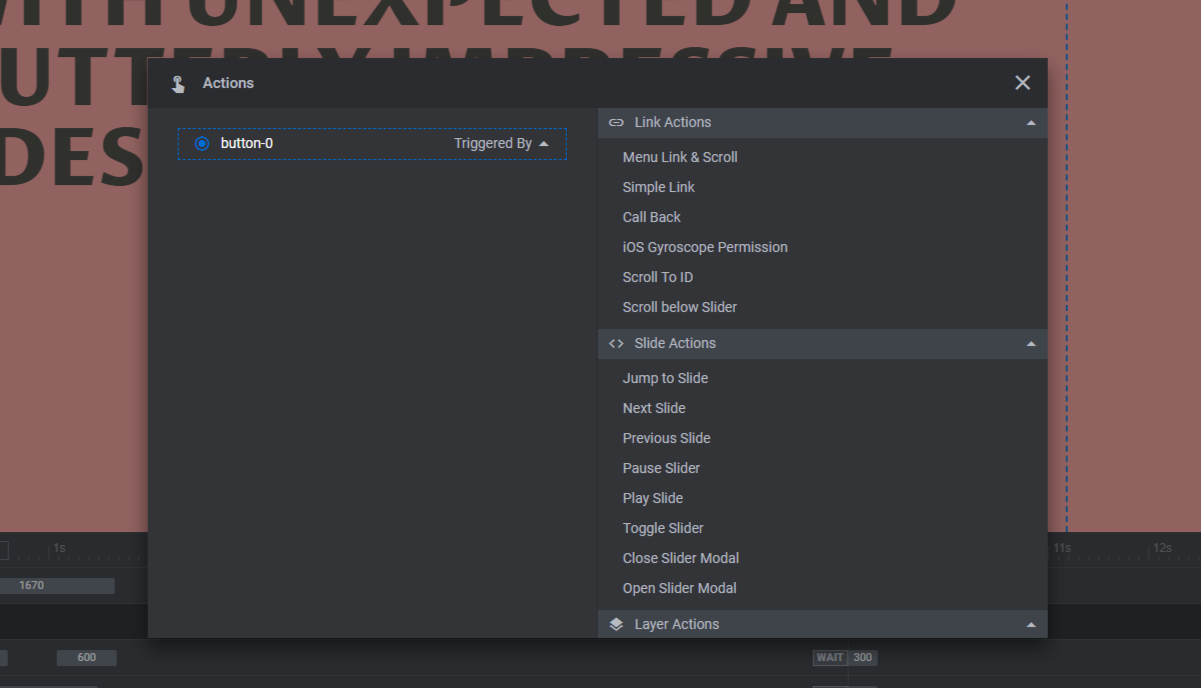
Hero sections most commonly link to another section on the home page. However, they can also point visitors to an internal link on the site.
If you want to create an auto-scroll action, choose either Scroll to ID or Scroll below Slider. If you want to add an internal link, choose Simple Link. Then configure the settings as needed.
Learn more:
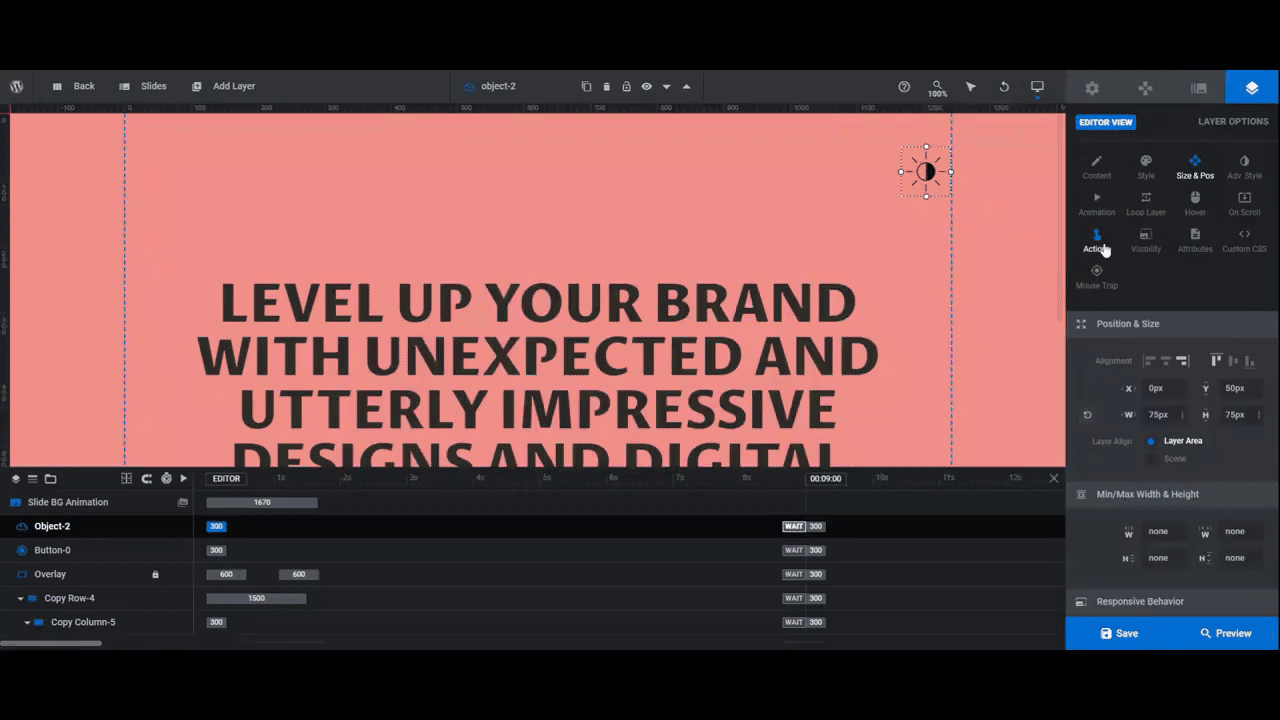
Step 6: Create a dark/light mode switch
There are different layers you can use to add a dark/light mode switch to your hero section (or to the top of your website). You can insert icons using the Text layer. You can also do this from the Icon/SVG library.
Another option is to upload a custom icon or SVG file. This is what we’ll be doing.
Go to “Add Layer” and click on Icon/SVG. Go to My SVG Library on the left. Then click the blue Import SVG Files at the bottom.
Upload your transparent SVG file. Then select it from the library to insert it into the page.
Use the “Size & Pos” settings to move the icon into place. You can also use the W and H settings to resize the icon if it’s too large.
Now we need to set up this dark/light mode switch to work the way the text layer used to work. Open the “Actions” panel once more.
Create a new action with the following settings:
- Action Type: Go to Frame “N”
- Interaction: Mouse Enter
- Target Layer: Overlay
- Go to Frame: show
- Frame waits on Action: Enabled
What this setting does is reveal the Overlay layer when someone hovers over our dark/light mode icon. The Overlay will make the design go dark.
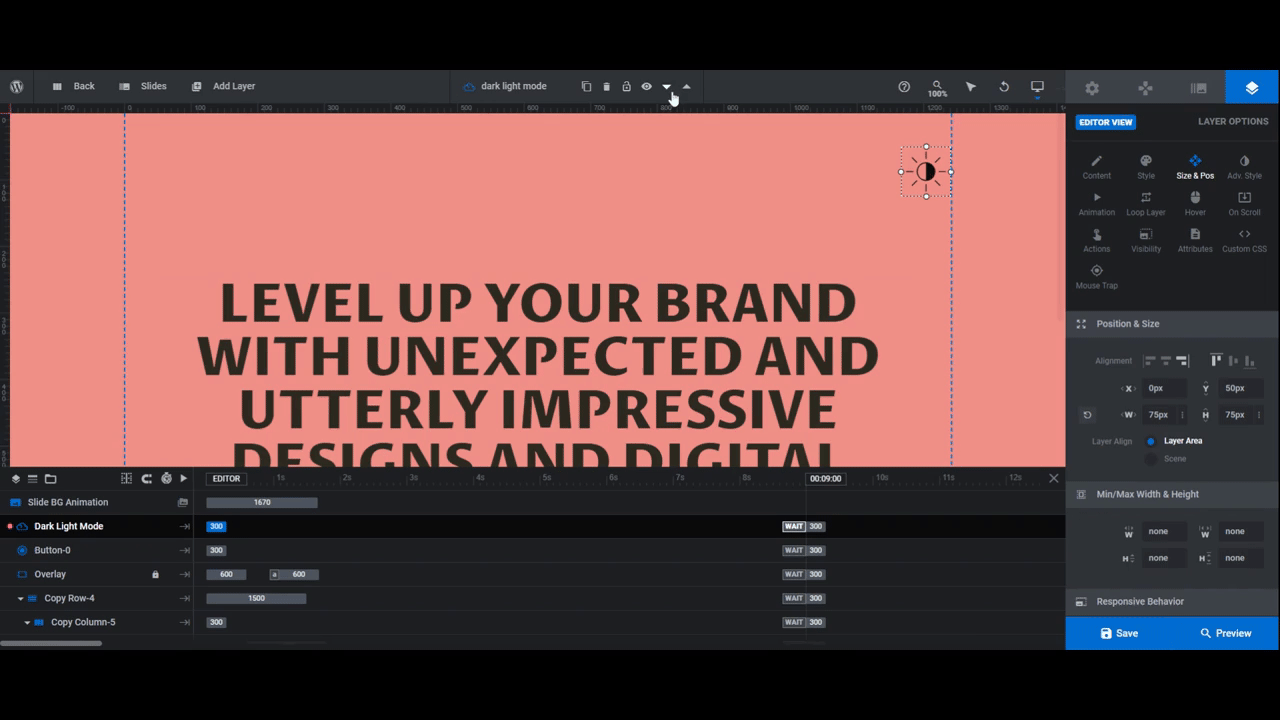
Then, create a second action with the following settings:
- Interaction: Mouse Leave
- Action Type: Go to Frame “N”
- Target Layer: Overlay
- Go to Frame: Anim To
- Frame waits on Action: Disabled
This will revert the hero section back to the original colors.
Note: There are other ways to configure this dark/light mode toggle. For example, you can set it up with a Click interaction as opposed to a mouse trigger. That’ll give the toggle more of a traditional feel.
Learn more:
Step 7: Move new layers behind the overlay
When adding new layers in Slider Revolution, they’re automatically inserted at the top of the timeline editor. This places these layers in front of all the other layers. (The higher up in the timeline that a layer appears, the further forward it is on the z-axis.)
In order for our Overlay effect to work, these layers need to be placed behind it.
In the timeline editor, drag and drop both the button as well as the dark/light mode toggle so that they’re below Overlay. You’ll see a thin blue line appear that lets you know they can be dropped into place.
Save your changes when you’re done.
Learn more:
Step 8: Do a responsive check and edit
The last thing we’re going to do is make sure that all the new elements we added look good on smaller screens. You can see how this looks from the Preview screen. However, the responsive editor is inside Slider Revolution, so it’s easier to preview these UIs from the toolbar dropdown.
Select each device one at a time. Then edit the layers as needed from the “Size & Pos” panel.
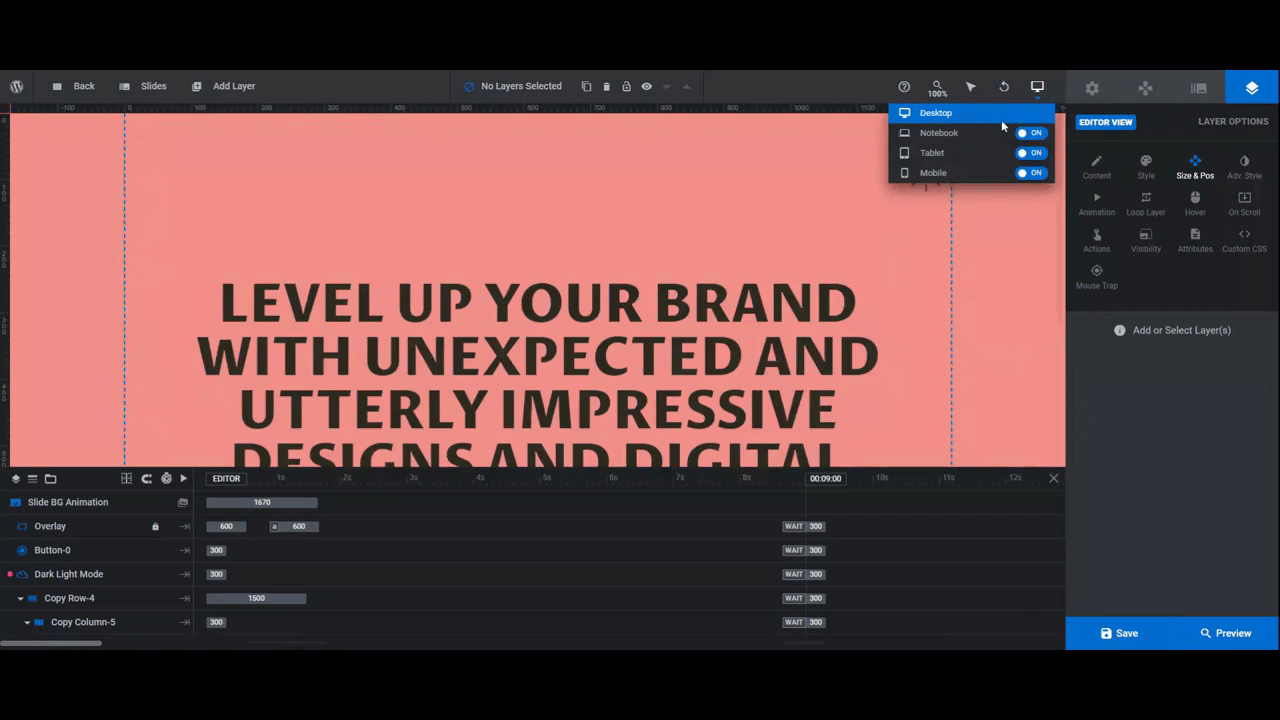
You’ll be able to refine the alignment, position, and size for the smaller screens here. Any changes made from the responsive editor will only affect the device you’re working on, not the original responsive layout.
When you’re finished, open the Preview. When you’re satisfied with how your design and dark/light mode effect turned out, save your changes.
You can now embed this hero section using the shortcode under “Module Options” or using the Slider Revolution page builder widget.
Learn more:
Create a dark/light mode effect that your visitors won’t be expecting
There are other aspects of this template you can edit, like the colorful fluid effects that move around the screen and the style of animation. That said, even with minimal edits and a new dark/light mode switch, you can see how easy it is to drastically overhaul the original style of the Modern Web Agency template.


